Why Initiate a Repair Job
There are 3 cases that may exist when a vendor adds or receives a piece of equipment for repair:
Case 1
- The component has a plant tag ID, and a plant user has already entered the information into TANGO™ showing it has been “Sent for Repair”.
- In this case, go to section Equipment Repair Data Entry or Edit Equipment Definitions.
Case 2
- The component has a plant tag ID, but the plant has not entered “Sent for Repair” for that plant tag into TANGO.
- In this case, go to section Find Equipment to learn how to search for equipment or Send Equipment for Repair once a search has been completed.
Case 3
- The component does not have a plant tag ID, is missing its information, or is a new piece of equipment that needs to be entered.
- In the case of missing information, search for the equipment with other provided information (HP, RPM, Framesize, serial number, etc.). See Find Equipment.
- In the other two instances, a new piece of equipment will need to be added and attach a permanent plant tag to the equipment. See Add New Equipment.
Login
Users can log into Repair Tracker in two ways.
1) Visit TF7.com, hover or click on “Customer Login” and click “Repair Tracker.”
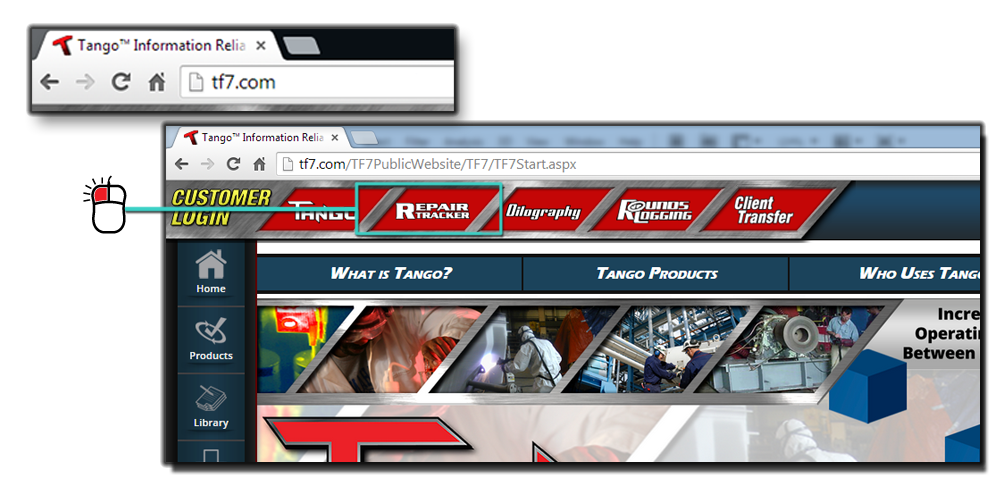
2) Enter your Username and Password
![]() TANGO users will need to contact your TANGO Administrator to be set up for Repair Tracker. Repair shop users need to contact your customer’s TANGO Administrator or TF7 to be set up for Repair Tracker.
TANGO users will need to contact your TANGO Administrator to be set up for Repair Tracker. Repair shop users need to contact your customer’s TANGO Administrator or TF7 to be set up for Repair Tracker.
3) Click “Login”.
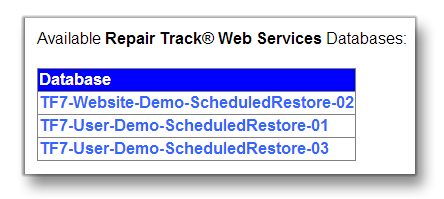
4) Choose which database you wish to connect to.
User Interface
The TANGO Repair Tracker™ User Interface provides quick navigation to repair information.
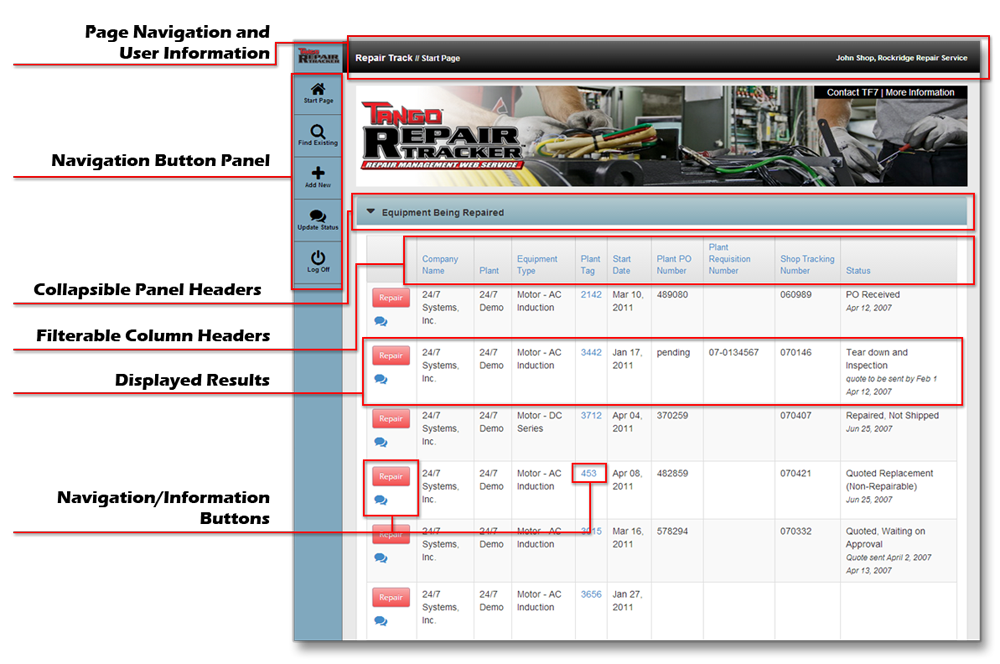
Page Navigation and User Information Panel
- This panel displays the current navigation page for easy recognition and the user’s name and vendor/plant they are associated with.
Navigation Button Panel
- The large format buttons allow for quick and easy navigation with Repair Tracker to connect the user to locations.
Start Page
- Directs the user back to the start page.
Find Existing
- Allows users to find existing equipment by repair data information (PO No., Shop Tracking No., etc.) or by equipment properties (equipment type, state, or properties).
Add New
- Users have the ability to add new equipment to the database they are logged into.
Update Status
- Vendor can enter repair status data for equipment being repaired.
Log Off
- Disconnects the user from Repair Tracker and redirects the user to the Repair Tracker login page.
Collapsible Panel Headers
- Section/Panel Headers give the description of the below results. Headers can be collapsed to easily navigate between multiple headers.
Filterable Column Headers
- Column headers in blue text allow users to sort a column by alpha, numeric, or date, helping users to navigate through the results.
Displayed Results
- Most reports/panels display results in a row with alternating color rows to make reading the data more convenient.
Navigation/Information Buttons
- There are multiple types of buttons within the reports that will navigate users to report details, editors, or item information pages.
Equipment Repair
The first screen that will appear after a user logs in, users will see the Equipment Being Repaired and Recently Repaired Equipment panels.
Equipment Being Repaired Panel
- Provides a list of equipment currently at the repair shop to be repaired.
![]() Plant users will only see the equipment that is associated with their plant. Vendors will see all equipment that is associated with their repair shop.
Plant users will only see the equipment that is associated with their plant. Vendors will see all equipment that is associated with their repair shop.
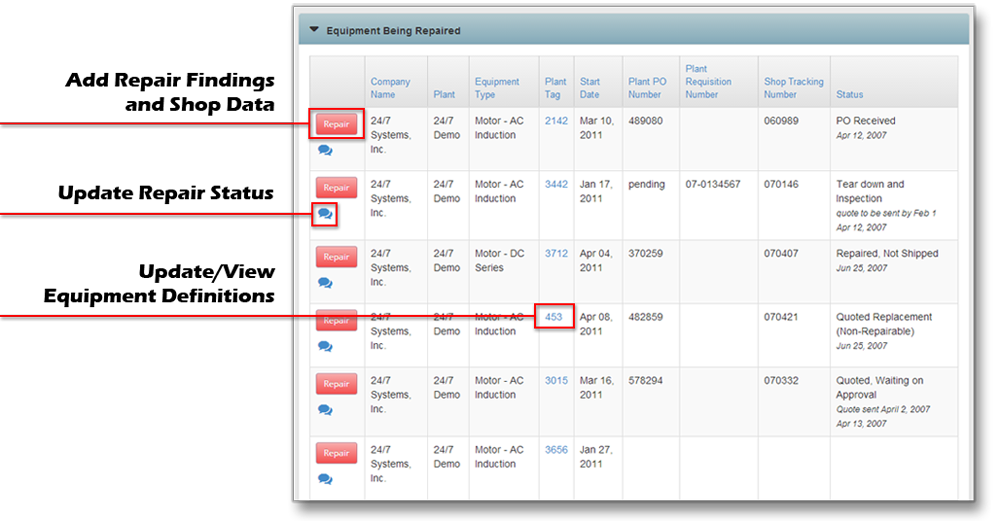
Repair button
- Adds repair findings and shop data. Equipment Repair Data Entry.
Update Status Icon
- Updates/adds repair shop or repair status information to a piece of equipment.
Plant Tag Number link
- Under the Plant Tag number column, allows vendors to view or edit equipment definitions for that piece of equipment.
Recently Repaired Equipment Panel
- Provides a list of equipment that has recently been repaired.

Vendors can click the Repair button to view repair findings and see repair history.
The text at the bottom of the Recently Repaired Equipment tell the user how many days recently repaired equipment will display in this panel. This can be adjusted by contacting 24/7 Systems.
Edit Equipment Definitions
Vendors have the ability to update equipment definitions by clicking the plant tag number in the Equipment Being Repaired and Recently Repaired Equipment reports.
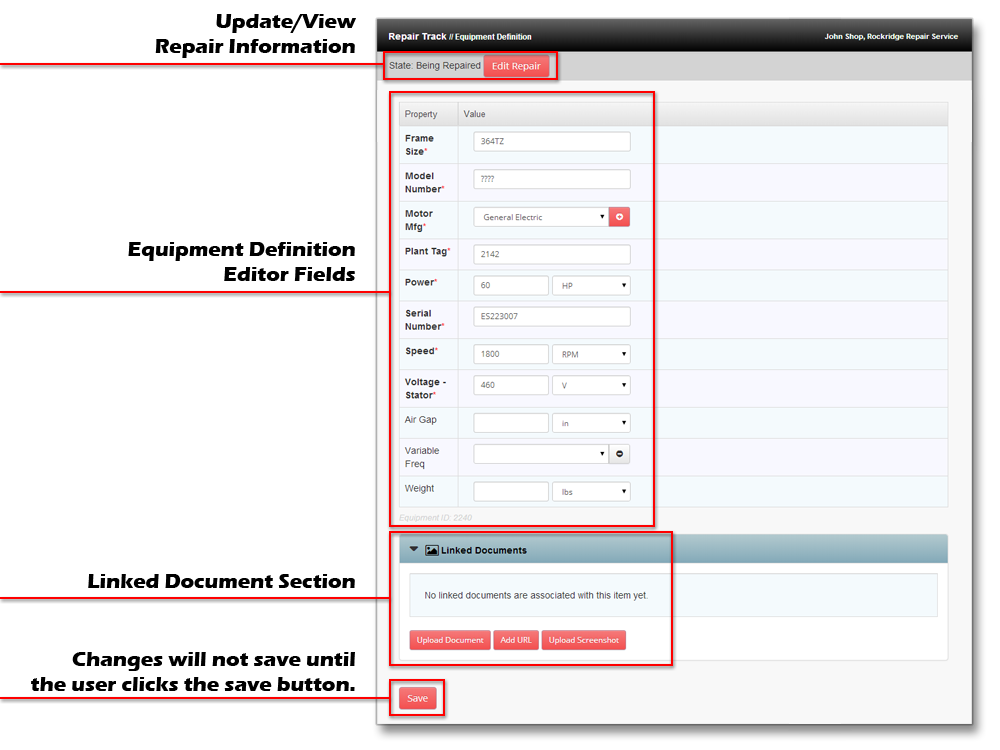
Users have multiple options from the Equipment Definition Editor.
View/Edit Repair Information
- Users can navigate to the Repair Equipment section.
Edit Equipment Definitions
- Vendors can input or edit the definitions by clicking in the text/lookups fields next to the properties.
- Click Save at the bottom to save the changes.
Edit Linked Documents
- Vendors can view, add, or edit linked documents associated with the equipment.
Save
- Be sure to click the save button after making any changes to the equipment properties, or the changes will not be kept.
Send Equipment for Repair from Plant
After searching for a piece of equipment, users have two options from the results page: View Equipment Definitions and Send For Repair. Click send equipment for repair.

Users will be directed to the Add Repair Entry page.
Fill out the repair information form and click save at the bottom.
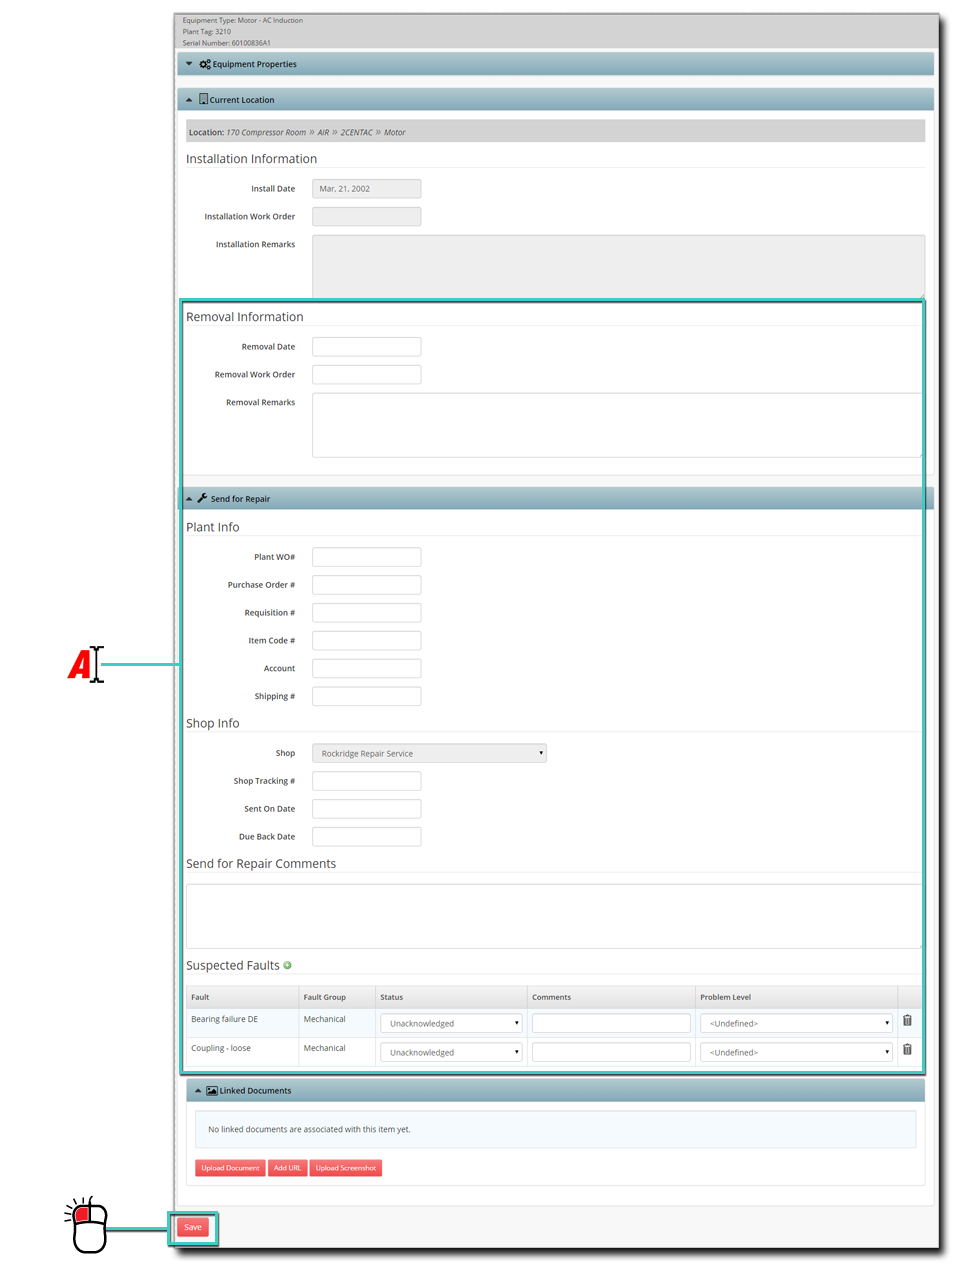
This will add the repair entry to the start page and repair information can then be added.
Equipment Repair Data Entry
This section is designed to provide the vendor with the ability to enter repair data, shop data, view procedures and equipment properties, enter comments, add linked documents, and close the repair.
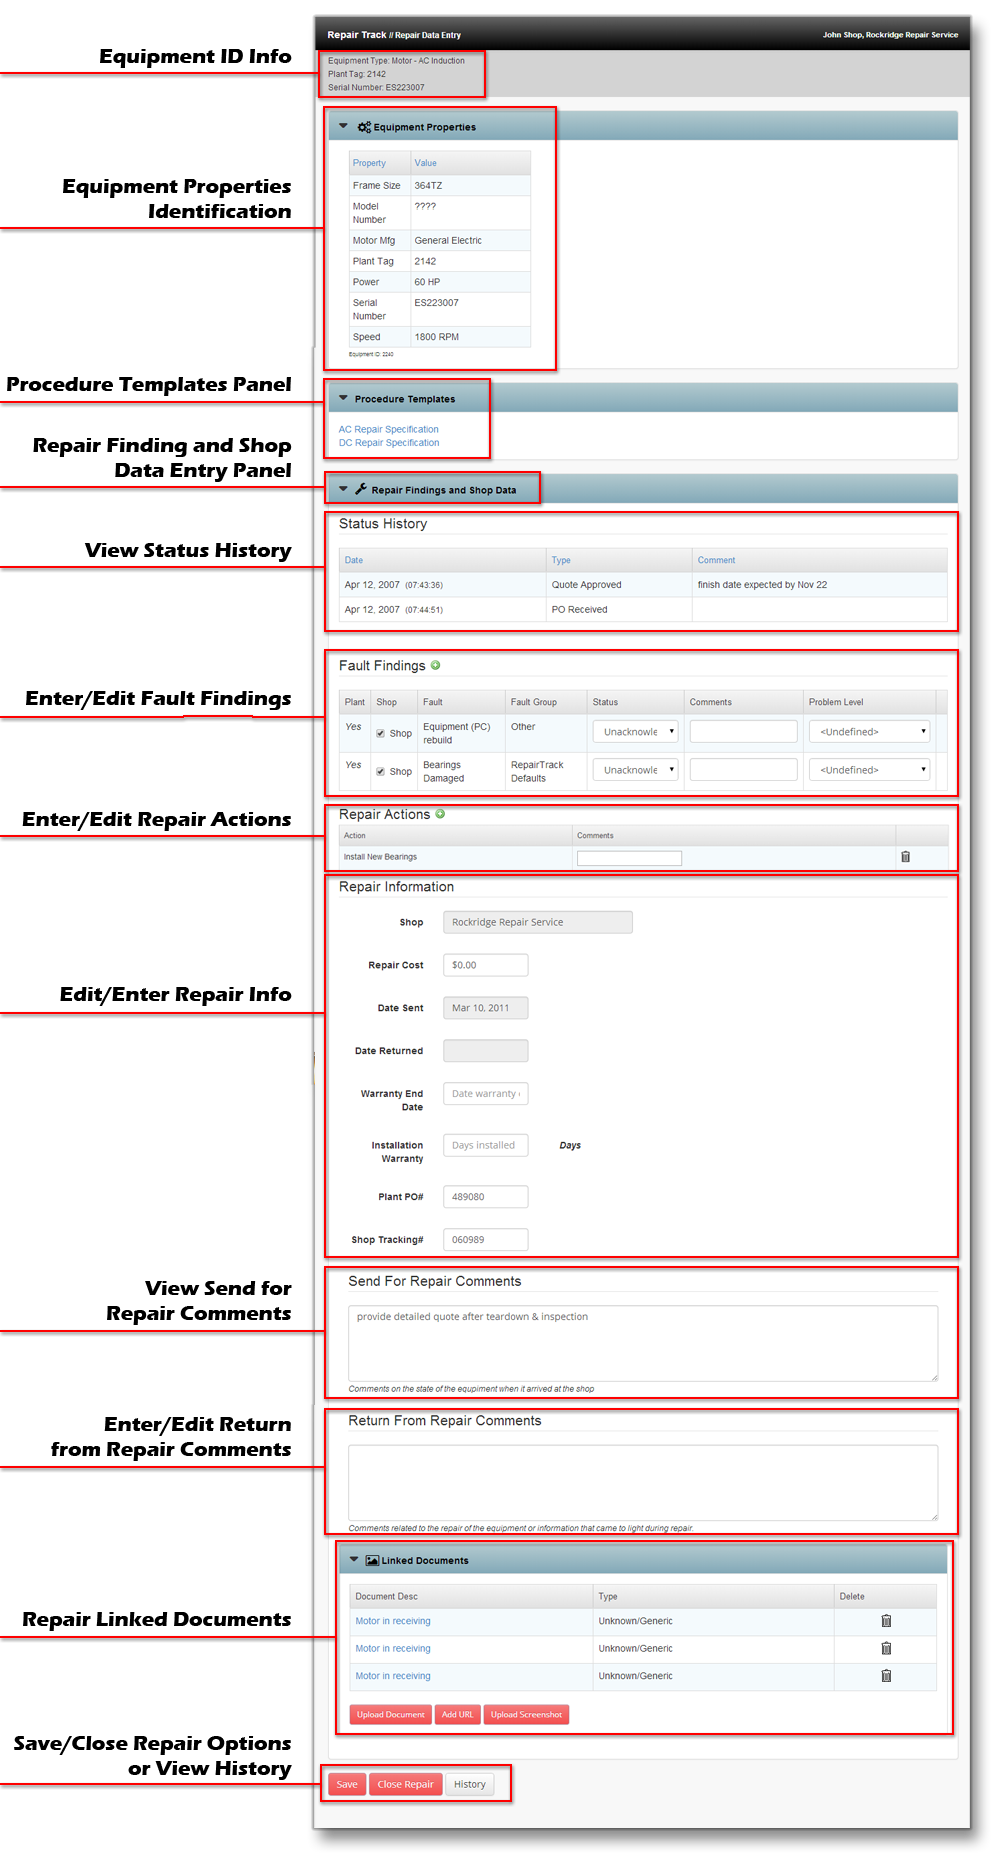
Equipment ID Info
- Provides the equipment type, plant tag, and serial number for the selected equipment.
Equipment Properties Identification (collapsed by default)
- Provides more detailed equipment information about the selected equipment.
Procedure Templates Panel (collapsed by default)
- Provides procedure linked document templates for use by the repair shop, provided by the plant/manufacturer.
Repair Finding and Shop Data Entry Panel
- The main panel for repair shops to enter their data for the selected equipment.
View Status History
- Shows the past and current status of the selected equipment.
Edit/Enter Fault Findings
 – Allows the vendor to add a fault to the Fault Finding list.
- Plant – Specifies if the Plant submitted the Fault Findings with a yes or no.
- Shop – Specifies if the Shop confirms or added the faults with a check, uncheck boxes mean they may not agree with the plant’s findings.
- Fault – Specifies the name of the faults found.
- Fault Group – Specifies the fault group.
- Status – Pick list options about the status of the repair. Not Found, Found, Not Fixed, etc.
- Comments – Allows comments about the repair status to be entered.
- Problem Level – Pick list option to specify the reason/level of the problem. Root Cause, Secondary Cause, etc.
Edit/Enter Repair Actions
 – Allows the vendor to add a repair action.
- Actions – Specifies the repair action taken to fix a problem.
- Comments – Allows the vendor to enter a comment about the Repair Action.
 – Allows the vendor to remove the Repair Action.
Edit/Enter Repair Info
- Shop – Displays the shop performing the repair.
- Repair Cost – Allows the vendor to specify the cost of the repair.
- Date Sent – Displays the date received by the repair shop.
- Date Returned – Will not display a date until the repair is closed.
- Warranty End Date – Allows the vendor to specify the length of the warranty.
- Installation Warranty – Allows the vendor to specify a number of days installed that the warranty will cover.
- Plant PO # – Enter or displays the Plant PO number.
- Shop Tracking # – Enter or displays the Shop Tracking number.
Send for Repair Comments
- Instructions given by the plant for the vendor to follow or need to know information.
Enter/Edit Return from Repair Comments
- Instructions given by the vendor to the plant as need to know information.
Repair Linked Documents
- Allows the vendor to add linked documents (pictures, instructions, etc) about the repair.
Save/Close/View History Buttons
- User buttons to save, close, or view history.
- Save – Saves the information entered in the form above, but keeps the repair open for further information and instructions.
- Close Repair – Saves and closes the above repair information and sends the repair data to Recently Repaired on the home page.
- History – Allows vendors and users to view the history associated with the selected equipment (Number of Days Installed and Equipment Location History).
Repair Status Data Entry
Vendor can add or edit Repair Status information in two ways:
- Click
 on the Start Page in the Equipment Being Repaired section and enter the shop tracking number.
 - Click Update Status button on the navigation panel and enter the shop tracking number.

Users will see the following page:
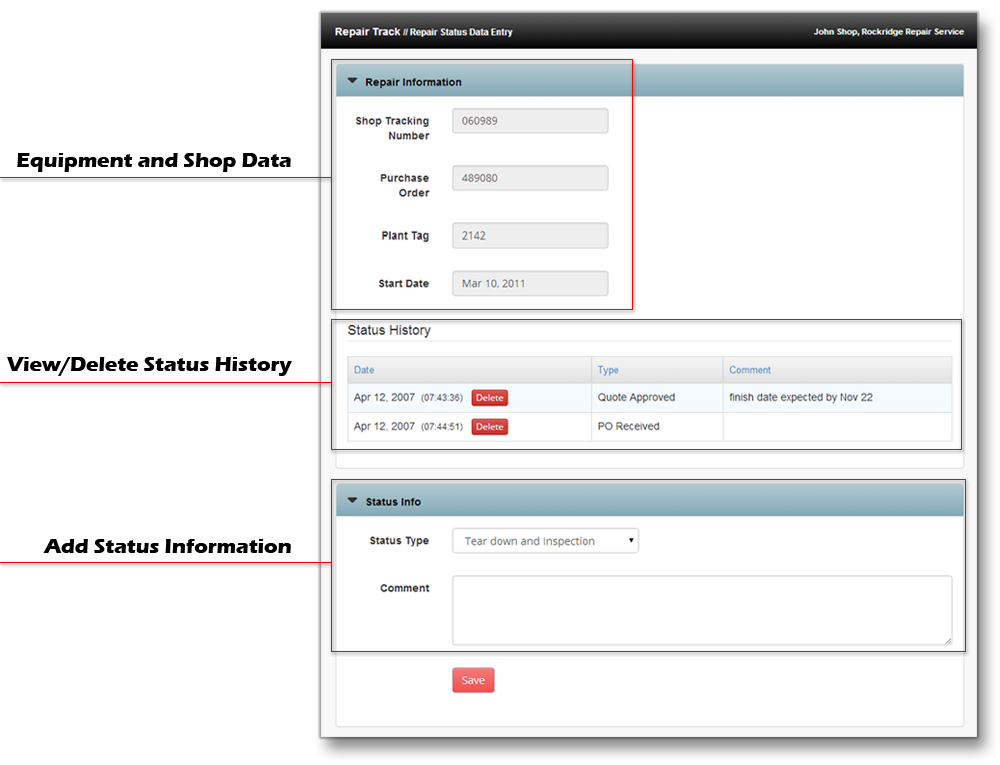
Equipment and Shop Data
- Displays the Equipment and Shop information for the selected equipment.
View/Delete Status History
- View the status history of the selected equipment or delete the status history.
Add Status Information
- Enter the status (pick list) and comments of the selected equipment.
Find Equipment
Vendors and Plant users can find equipment in Repair Tracker and TANGO using the Find Equipment button on the navigation panel.
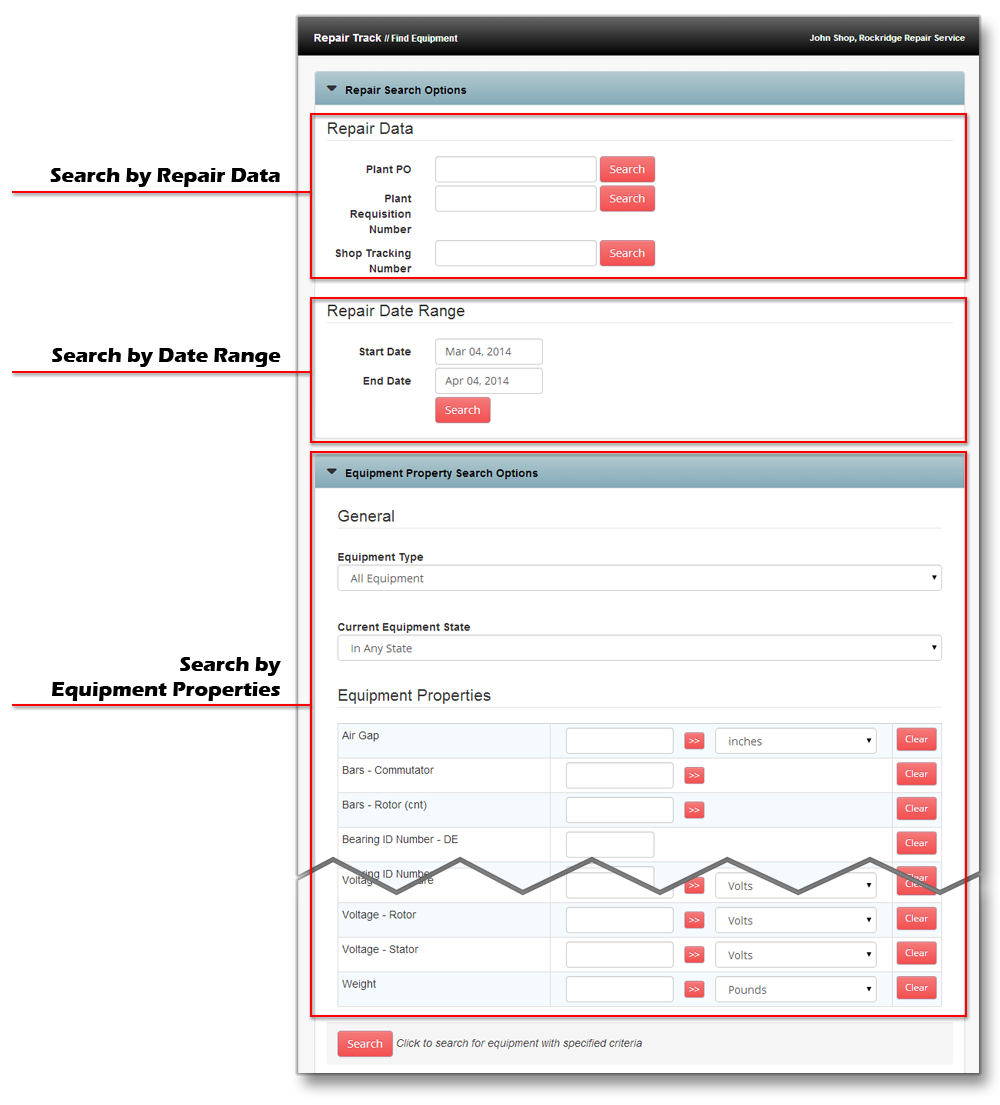
Users have three search methods to find equipment:
Plant/Shop Data
- Search for equipment using the plant’s PO or Requisition number, or by the shop tracking number.
Date Range
- Specify a specific date range of repair equipment.
Equipment Properties
- Search by equipment properties, equipment type, or equipment state.
Add New Equipment
To add new equipment, click the Add New button on the navigation panel.
![]() In order for a vendor user to insert new equipment, a TANGO Database Administrator must set the user to have “Has Edit Equipment Rights” under the “User Configuration” in DBAdmin.
In order for a vendor user to insert new equipment, a TANGO Database Administrator must set the user to have “Has Edit Equipment Rights” under the “User Configuration” in DBAdmin.
Choose the Equipment Class and Type to add.
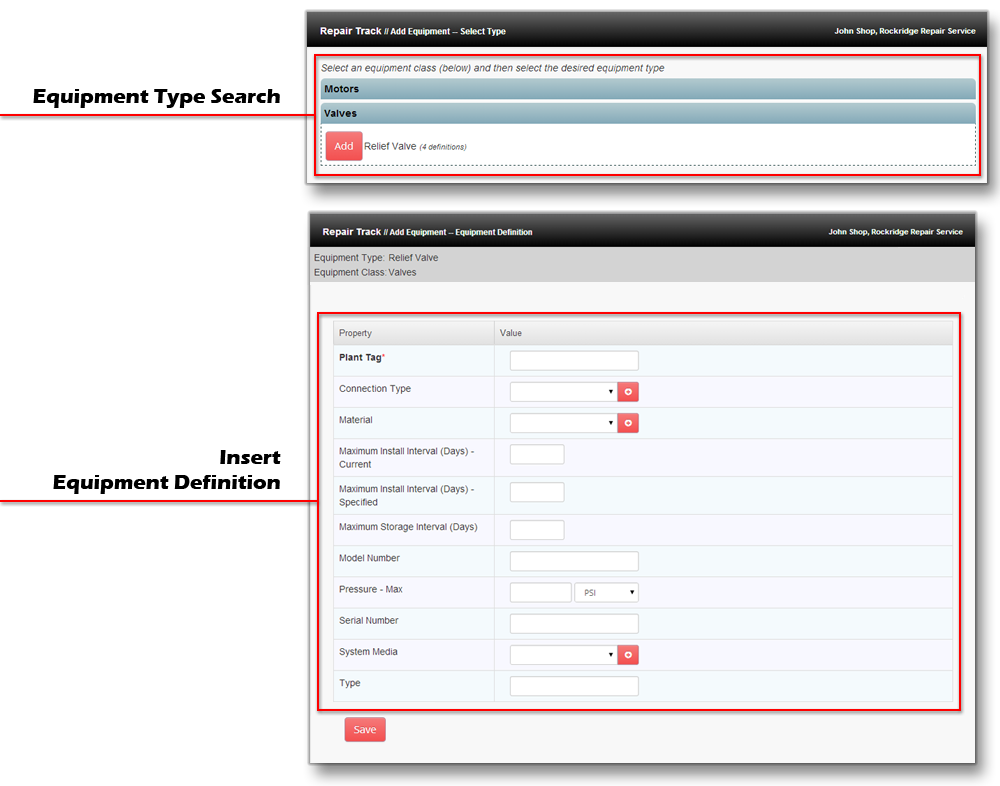
Insert the desired/required (required fields are bold and marked with an *) information.
Click Save.
After saving, users will be redirected to Equipment Repair Data Entry page.
